This is a one page guide from start to finish on how to create your first libgdx game for android/iOS/html5/desktop.
I am however going to skip downloading java, SDK, and libgdx, as I’m assuming you already possess those if you are reading this. If you do not infact do, there are many various tutorials online that could explain it much better than I.
Step 1:
Design your game! Now this sounds like an obvious one, but many times it is easy to get carried away with a game idea without thought placed into the mechanics of the game. However, and possibly lucky for you, that is already completed for you in this tutorial. Here is how game planning takes place, for at least me:
- Idea: Static background with character on 1D plane that can slide left and right to dodge icicles that fall from the cave ceiling.
- Graphics: minimal style
- Objective: to survive as long as possible without getting hit.
- Challenges: collision detection on triangular icicles. Spawn rate of icicles (should be constantly random? Or increase over time?)
Step 2:
Creating basic graphics. At this stage we want to create basic graphics for our game so we can help visualize our code as we are creating our masterpiece. However, we wish to keep this rudimentary as we might not have the perfect graphical ideas ready just yet, as those usually spark into life as we play and develop our game more in-depth.
For creating graphics, it is best to get using something else besides Microsoft paint. While it can physically make any object by pixel editing, it does lack the key aspect of an “alpha” value. This is necessary as it is the transparency of they object, which is key if we wish to display graphics without a white border of empty pixels around them. For this, i recommend paint.net as a very simple free editor that is easy to pick up.
Creating cave background:
We are starting with the background of the cave with the dimensions of 800px tall by 480px wide as this will be the entire size of screen. The key parts needed are the ground for the character to run on and the top section of the cave for the icicles to spawn on. Thus, my rendition is shown below (Note: I have pasted in all of the pictures as full size images, so that you can simply save them to your computer to use in the game):
Creating icicle:
Here we are creating the icicle, one again by sticking to just the basics we want to just create the shape that will need collision detection, instead of focusing on the appearance. We are going to create three different icicle forms as to break up the monotony that only one type might create.
Type A:
Type B:
Type C:
Creating Guy:
This may be the hardest graphic decision you have to make, as with that, the motivation and inspiration will come over time. So to start simply, here is the guy we will use:
Step 3:
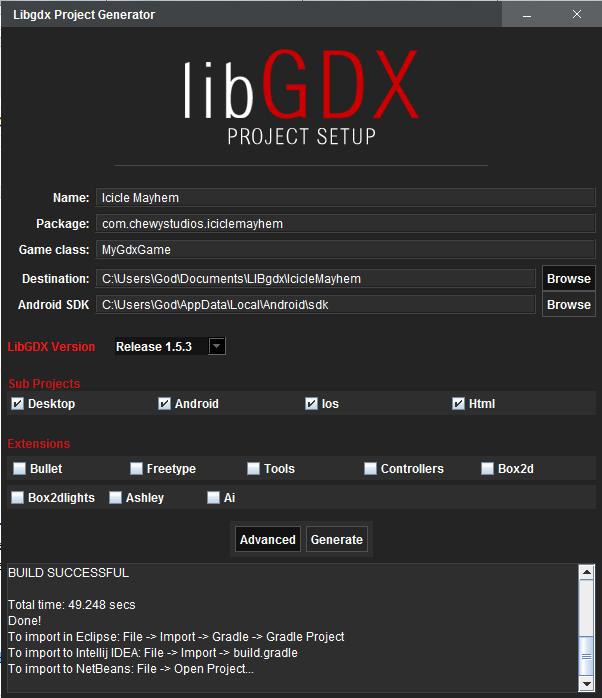
Start creating the program! Open up your libGDX Project Generator and fill out the necessary package details. Also, if you run into issues with the destination folder, simply create a blank folder where you wish for the project to end up, and set the destination to that. (note: you do not need to use the same package name or game name as I have in this tutorial):
Now simply import the project into your preferred IDE, android studio for I, and we are ready to start programming.
Step 4:
(Note: Full Java class codes are at the end of Step 8) Start by entering the Core directory and finding your MyGdxGame.java file, this is where the programing will start. Below is the new code we will enter into our first java file, the code is commented for clarity.
 1
 2
 3
 4
 5
 6
 7
 8
 9
10
11
12
13
14
15
16
17
18
19
20
21
22
23
24
25
26
27
28
29
30
31
32
33
34
35
36
37
38
39
|
import com.badlogic.gdx.Game;
import com.badlogic.gdx.graphics.g2d.BitmapFont;
import com.badlogic.gdx.graphics.g2d.SpriteBatch;

public class MyGdxGame extends Game {

    //Define a public Spritebatch which we will use to render text onto the screen
    public SpriteBatch gameBatch;

    //Define a public font that we will use for all text.
    public BitmapFont gameFont;

    //Public void create() is ran when the program is started.
 @Override
 public void create () {
        //Creates the SpriteBatch for gameBatch to use
        gameBatch = new SpriteBatch();

        //Creates the font, which is the default font for LIBgdx.
        gameFont = new BitmapFont();

        //this will set the screen to our next class "GameScreen"
        this.setScreen(new GameScreen(this));
 }

    //Called upon render
 @Override
 public void render () {
        //Calls our render() method in our GameScreen
        super.render();
 }

    //Called when class is disposed
    public void dispose() {
        //disposes both SpriteBatch and BitmapFont
        gameBatch.dispose();
        gameFont.dispose();
    }
}
|
The GameScreen(this) will be in error, and that is okay! We have not created the GameScreen yet. The GameScreen will be its own java file and will act as the screen the currently runs our game. But why do we have to create another java file? You don’t have to, and you could do it all in this file, but this system works great for when you wish to have multiple screens in games.. such as a game screen.. settings screen… menu screen… etc..
Thus we now create GameScreen.java class in the same folder as our MyGdxGame.java class. The class below is outfited to the nearly bare minimum requirements for a functioning screen. It utilizes the functions of creating a camera, drawing to a screen, and handling screen and button inputs. The class is shown below:
  1
  2
  3
  4
  5
  6
  7
  8
  9
 10
 11
 12
 13
 14
 15
 16
 17
 18
 19
 20
 21
 22
 23
 24
 25
 26
 27
 28
 29
 30
 31
 32
 33
 34
 35
 36
 37
 38
 39
 40
 41
 42
 43
 44
 45
 46
 47
 48
 49
 50
 51
 52
 53
 54
 55
 56
 57
 58
 59
 60
 61
 62
 63
 64
 65
 66
 67
 68
 69
 70
 71
 72
 73
 74
 75
 76
 77
 78
 79
 80
 81
 82
 83
 84
 85
 86
 87
 88
 89
 90
 91
 92
 93
 94
 95
 96
 97
 98
 99
100
101
102
103
104
105
106
107
108
109
110
111
112
113
114
115
116
117
118
119
120
121
122
123
124
125
126
127
128
129
130
131
132
133
134
|
import com.badlogic.gdx.Gdx;
import com.badlogic.gdx.Input;
import com.badlogic.gdx.InputProcessor;
import com.badlogic.gdx.Screen;
import com.badlogic.gdx.graphics.GL20;
import com.badlogic.gdx.graphics.OrthographicCamera;


public class GameScreen implements Screen,InputProcessor {

    //Creates a reference to hold our "passed" game.
    private MyGdxGame game;

    //Defining the camera to be used
    private OrthographicCamera camera;

    public GameScreen(MyGdxGame game) {
        //assigns the game we passed to the placeholder
        this.game = game;
        //creates the camera
        camera = new OrthographicCamera();
        //Sets the screen to be 800 width by 480 height
        camera.setToOrtho(false, 480, 800);
        //very important, lets us use the Input methods!
        Gdx.input.setInputProcessor(this);
    }
    @Override
    public void render(float deltaTime){
        //Sets the color to be applied after clearing the screen (R,G,B,A)
        Gdx.gl.glClearColor(0,0,255,1);
        //Clears the screen
        Gdx.gl.glClear(GL20.GL_COLOR_BUFFER_BIT);
        //updates camera view
        camera.update();
        //makes the camera fit onto the available screen
        game.gameBatch.setProjectionMatrix(camera.combined);
        //Starts gameBatch for drawing
        game.gameBatch.begin();
        //All drawing needs to be done here
        //Ends the gameBatch after drawing
        game.gameBatch.end();
    }

    //This method gets called when a key is pressed down
    public boolean keyDown (int keycode) {
        //switches case for keycode variable
        switch (keycode) {
            //if left key is pressed
            case Input.Keys.LEFT:
                break;
            case Input.Keys.RIGHT:
                break;
            case Input.Keys.UP:
                break;
            case Input.Keys.DOWN:
                break;
            default:
        }
        return false;
    }

    //happens upon lifting finger off of key
    public boolean keyUp (int keycode) {
        //switches key code of lifted key
        switch (keycode) {
            //called upon left key lifted
            case Input.Keys.LEFT:
                break;
            case Input.Keys.RIGHT:
                break;
            case Input.Keys.UP:
                break;
            case Input.Keys.DOWN:
                break;
            default:
        }
        return false;
    }

    public boolean touchDown(int screenX, int screenY, int pointer, int button) {
        return false;
    }

    public boolean keyTyped (char character) {
        return false;
    }

    public boolean touchUp (int x, int y, int pointer, int button) {
        return false;
    }

    public boolean touchDragged (int x, int y, int pointer) {
        return false;
    }

    public boolean mouseMoved (int x, int y) {
        return false;
    }

    public boolean scrolled (int amount) {
        return false;
    }

    @Override
    public void resize(int width, int height){

    }

    @Override
    public void show(){

    }

    @Override
    public void hide(){

    }

    @Override
    public void pause(){

    }

    @Override
    public void resume(){

    }

    @Override
    public void dispose(){

    }

}
|
So this is the skeleton that we will create our game from. It is time to start developing towards our game, and to do that, lets start with drawing our background onto the screen. First, lets place our assets into the game so we can access them, to do this, simply drag your .png graphic files (needs to be .png!) to the assets folder under the android directory. For example on my p.c, my graphics assets are located at (C:UsersGodDocumentsLIBgdxIcicleMayhemandroidassets).
Thus, to get started, define the following new variable at the top of the GameScreen class:
1
2
|
//Texture for the cave background
    private Texture caveBackground = new Texture("cavebackground.png");
|
Then place the following code in the render() function in the GameScreen section:
1
2
3
4
5
6
7
|
        //Starts gameBatch for drawing
        game.gameBatch.begin();
        //All drawing needs to be done here
        //Draws the Cave Background starting at x = 0, y = 0
        game.gameBatch.draw(caveBackground,0,0);
        //Ends the gameBatch after drawing
        game.gameBatch.end();
|
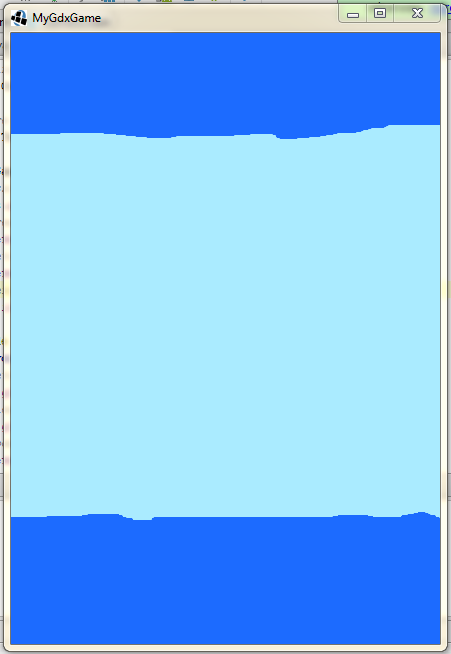
Then you may test your app either by running in desktop mode (I have a tutorial as well as many others on how to set it up) or deploying to your phone. The result should be a game that displays are cave background:
Note: if running it straight to your android phone, the default screen layout is landscape. You will need to change it to portrait by editing the androidmanifest.xml file and change the layout attribute:
1
|
android:screenOrientation="portrait"
|
Step 5:
Creating the character!
First we are going to create another java class so that we may make our character an object in java. To do this, create another class in the same directory named Character.java and place the following code into it. It is commented for what each portion of the code is doing.
 1
 2
 3
 4
 5
 6
 7
 8
 9
10
11
12
13
14
15
16
17
18
19
20
21
22
23
24
25
26
27
28
29
30
31
32
33
34
35
36
37
38
39
40
41
42
43
44
45
46
47
48
49
50
51
52
|
public class Character {
    //stores x loc (start at 240)
    int x = 240;
    //stores y loc (start at 167)
    int y = 167;
    //texture for our character
    public Texture texture = new Texture("guy.png");
    //speed for our character in pixels/s
    int speed = 300;

    //defining constants for direction
    static final int LEFT = -1;
    static final int RIGHT = 1;
    static final int STANDING = 0;
    int direction = 0;

    //initialization code
    public Character(){}

    //updates character's position
    public void update(float deltaTime){
        //stores the value of the last x
        int lastx = this.x;
        //change in distance = direction * speed * time
        this.x += direction*speed*deltaTime;
        //if the new location of the character is off the screen to the left
        if(this.x < 0){
            //put the character back to last location
            this.x = lastx;
        }
        //if the new location of the character is off the screen to the right
        if(this.x > 480 - texture.getWidth()){
            //put the character back to last location
            this.x = lastx;
        }
    }

    //changes the character direction to right
    public void goRight(){
        direction = RIGHT;
    }

    //changes character direction to left
    public void goLeft(){
        direction = LEFT;
    }

    //changes character direction to standing
    public void setStanding(){
        direction = STANDING;
    }
}
|
Now that we have an object for our character, we need to make the object in our game screen. We can create our object by defining him as such:
1
2
|
    //Creates a Reference for our character
    private Character character = new Character();
|
Now we must also update him within the game, allowing him to move across time. We then place a call for him to update within the Render block in the GameScreen.Java class but before we draw him. Thus, at the end of the render function in the GameScreen class, it should look similar to this:
 1
 2
 3
 4
 5
 6
 7
 8
 9
10
11
|
        //updates the character
        character.update(deltaTime);
        //Starts gameBatch for drawing
        game.gameBatch.begin();
        //All drawing needs to be done here
        //Draws the Cave Background starting at x = 0, y = 0
        game.gameBatch.draw(caveBackground,0,0);
        //Draws the character at correct location
        game.gameBatch.draw(character.texture,character.x,character.y);
        //Ends the gameBatch after drawing
        game.gameBatch.end();
|
Now, we also need a way to process either key presses from a key board or screen touches from fingers. For screen presses, we call a function in the render block to check for the current location of the finger and to determine the direction the character should go, the function call in the render block and the function are as follows including the additional coding needed for key presses:
 1
 2
 3
 4
 5
 6
 7
 8
 9
10
11
12
13
14
15
16
17
18
19
20
21
22
23
24
25
26
27
28
29
30
31
32
33
34
35
36
37
38
39
40
41
42
43
44
45
46
47
48
49
50
51
52
53
54
55
56
57
58
59
60
61
62
63
64
65
66
67
68
69
70
71
72
|
@Override
    public void render(float deltaTime){
        //Sets the color to be applied after clearing the screen (R,G,B,A)
        Gdx.gl.glClearColor(0,0,255,1);
        //Clears the screen
        Gdx.gl.glClear(GL20.GL_COLOR_BUFFER_BIT);
        //updates camera view
        camera.update();
        //makes the camera fit onto the available screen
        game.gameBatch.setProjectionMatrix(camera.combined);
        //checks if teh screen is pressed
        checkScreenPress();
        //updates the character
        character.update(deltaTime);
        //Starts gameBatch for drawing
        game.gameBatch.begin();
        //All drawing needs to be done here
        //Draws the Cave Background starting at x = 0, y = 0
        game.gameBatch.draw(caveBackground,0,0);
        //Draws the character at correct location
        game.gameBatch.draw(character.texture,character.x,character.y);
        //Ends the gameBatch after drawing
        game.gameBatch.end();
    }

//checks if the screen is pressed
    public void checkScreenPress(){
        //if screen is pressed
        if(Gdx.input.isTouched()) {
            //gets the location of the press, and determines which half of the screen was pressed
            if ((float) Gdx.input.getX() / Gdx.graphics.getWidth() <= .5) {
                //if left half of screen, go left
                character.goLeft();
            } else {
                //if not on the left half of screen, it must be going right
                character.goRight();
            }
        }
    }

//called when the person lifts their finger off of the screen
    public boolean touchUp (int x, int y, int pointer, int button) {
        //set character to standing
        character.setStanding();
        return false;
    }


//This method gets called when a key is pressed down
    public boolean keyDown (int keycode) {
        //switches case for keycode variable
        switch (keycode) {
            //if left key is pressed
            case Input.Keys.LEFT:
                //sets character going left
                character.goLeft();
                break;
            case Input.Keys.RIGHT:
                //sets character going right
                character.goRight();
                break;
            default:
        }
        return false;
    }

    //happens upon lifting finger off of key
    public boolean keyUp (int keycode) {
        //sets character standing upon lifting off of key
        character.setStanding();
        return false;
    }
|
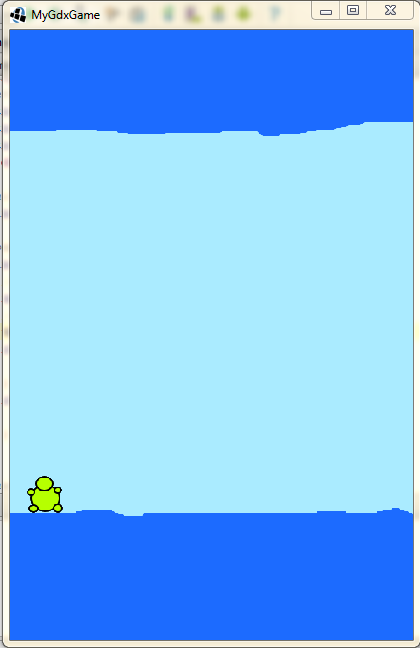
Now upon testing your application, you can move the character on a 1D plane, with boundaries at the walls.
Step 6:
It is now starting to take shape, now we are going to add icicles that spawn from the ceiling and drop at intervals. The first step is to create an Icicle.java class so that we may create an icicle object. We do that by the following:
 1
 2
 3
 4
 5
 6
 7
 8
 9
10
11
12
13
14
15
16
17
18
19
20
21
22
23
24
25
26
27
28
29
30
31
32
33
34
35
36
37
38
39
40
41
42
43
44
45
46
|
public class Icicle {
    //variables for x location, y location, and speed of dropping
    public int x;
    public int y;
    public int speed;

    //codes for the three different icicle types
    static final int typeA = 0;
    static final int typeB = 1;
    static final int typeC = 2;
    public int code;

    //placeholder for icicle texture
    public Texture texture;

    //initiation code
    public Icicle(int x, int y, int speed, int code){
        //setting variables
        this.x = x;
        this.y = y;
        this.speed = speed;
        this.code = code;

        //sets texture to icicle depending on code
        switch(code){
            case typeA:
                this.texture = new Texture("icicleA.png");
                break;
            case typeB:
                this.texture = new Texture("icicleB.png");
                break;
            case typeC:
                this.texture = new Texture("icicleC.png");
                break;
        }

        //changes the y value so that irregardless of texture height, it will always start on the
        //the top of the ice cave ceiling.
        this.y -= this.texture.getHeight();
    }

    //updates icicle's y position as it falls with time;
    public void update(float deltaTime){
        this.y -= speed*deltaTime;
    }
}
|
Next we are going to create an IcicleManager.Java class that will manage the spawn rates of our objects.
 1
 2
 3
 4
 5
 6
 7
 8
 9
10
11
12
13
14
15
16
17
18
19
20
21
22
23
24
25
26
27
28
29
30
31
32
33
34
35
36
37
38
39
40
41
42
43
44
45
46
47
48
49
|
public class IcicleManager {
    //stores the refresh rates set for the icicles
    public int aRefreshRate;
    public int bRefreshRate;
    public int cRefreshRate;

    //keeps a timer for each icicle type
    public float aTimer = 0;
    public float bTimer = 0;
    public float cTimer = 0;

    //initializes icicle manager with our set refresh rates.
    public IcicleManager(int aRefreshRate, int bRefreshRate, int cRefreshRate){
        this.aRefreshRate = aRefreshRate;
        this.bRefreshRate = bRefreshRate;
        this.cRefreshRate = cRefreshRate;
    }

    //receives the array of icicles and updates and returns the array
    public Array<Icicle> update(Array<Icicle> array, float deltaTime){
        //add the time passed to our timers
        aTimer += deltaTime;
        bTimer += deltaTime;
        cTimer += deltaTime;

        //if timer value is greater than refresh rate
        if(aTimer >= aRefreshRate){
            //create a new icicle at a random x Loc, 670 height, 300 speed, and a typeA icicle
            array.add(new Icicle(MathUtils.random(0,460),670,300,Icicle.typeA));
            //reset Timer
            aTimer = 0;
        }
        //if timer value is greater than refresh rate
        if(bTimer >= bRefreshRate){
            //create a new icicle at a random x Loc, 670 height, 300 speed, and a typeB icicle
            array.add(new Icicle(MathUtils.random(0,460),670,300,Icicle.typeB));
            //reset Timer
            bTimer = 0;
        }
        //if timer value is greater than refresh rate
        if(cTimer >= cRefreshRate){
            //create a new icicle at a random x Loc, 670 height, 300 speed, and a typeB icicle
            array.add(new Icicle(MathUtils.random(0,460),670,300,Icicle.typeC));
            //reset Timer
            cTimer = 0;
        }
        return array;
    }
}
|
Working our way back to the implementing these classes into the game, we are going to define two more variables in our GameScreen class:
1
2
3
4
5
|
    //Creates our icicle Manager with a description of how long to delay each icicle type
    public IcicleManager icicleManager = new IcicleManager(2,5,10);

    //creates an array to hold all of our icicles;
    public Array<Icicle> icicleArray = new Array<Icicle>();
|
Now we are going to have to add two additions to the render block of our game, one to update our icicles and one to facilitate the drawing of our icicles. The additions and new function are shown below:
 1
 2
 3
 4
 5
 6
 7
 8
 9
10
11
12
13
14
15
16
17
18
19
20
21
22
23
24
25
26
27
28
29
30
31
32
33
34
35
36
37
38
39
40
41
42
43
44
45
46
47
48
49
|
 @Override
    public void render(float deltaTime){
        //Sets the color to be applied after clearing the screen (R,G,B,A)
        Gdx.gl.glClearColor(0,0,255,1);
        //Clears the screen
        Gdx.gl.glClear(GL20.GL_COLOR_BUFFER_BIT);
        //updates camera view
        camera.update();
        //makes the camera fit onto the available screen
        game.gameBatch.setProjectionMatrix(camera.combined);
        //checks if the screen is pressed
        checkScreenPress();
        //updates the character
        character.update(deltaTime);
        //updates Icicle Manager
        icicleManager.update(icicleArray,deltaTime);
        //Starts gameBatch for drawing
        game.gameBatch.begin();
        //All drawing needs to be done here
        //Draws the Cave Background starting at x = 0, y = 0
        game.gameBatch.draw(caveBackground,0,0);
        //Draws the Icicles
        drawIcicles(deltaTime);
        //Draws the character at correct location
        game.gameBatch.draw(character.texture,character.x,character.y);
        //Ends the gameBatch after drawing
        game.gameBatch.end();
    }

//draws our icicles
    public void drawIcicles(float deltaTime){
        //creates an iterator which will analyze each icicile
        Iterator<Icicle> iterIcicle = icicleArray.iterator();

        //while there are more icicles to process...
        while(iterIcicle.hasNext()) {
            //move to next icicle and set a reference to our icicle
            Icicle icicle = iterIcicle.next();
            //update our icicle
            icicle.update(deltaTime);
            //if icicle is below y = 0, remove icicle from the array
            if(icicle.y < 0){
               iterIcicle.remove();
            }else{
                //else, draw the icicle on the screen.
                game.gameBatch.draw(icicle.texture,icicle.x,icicle.y);
            }
        }
    }
|
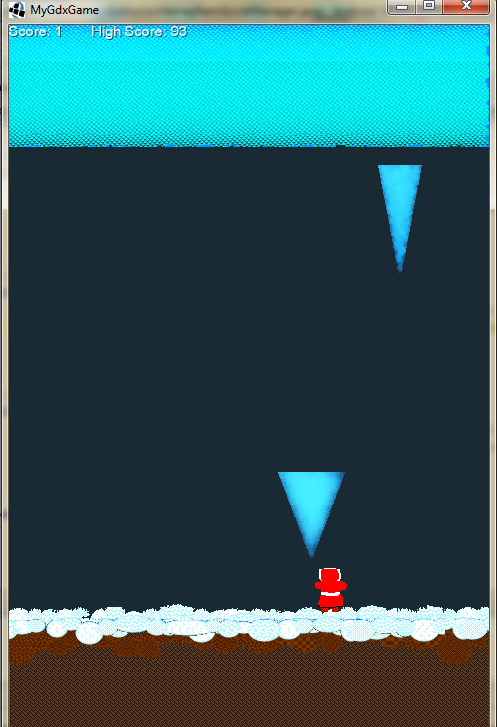
Now we are able to test our game and are able to spawn icicles that fall from the ceiling and disappear when off screen:
Step 7:
Dying! Woohoo! ha, but we do need to have an objective to this game, so we are going to need to create an object collision detection piece to facilitate losing in the game. Luckily for us, some of that work is done by utilizing libgdx’s rectangle class. With this rectangle class, we can make a rectangle in space, and be able to tell if that rectangle overlaps any other rectangle. However, we have a triangular shaped icicle that would not work well for collision detection if we were to stick a rectangle around it. Thus, we will create a series of 5 rectangles, you can do more if you wish, to encompasses the icicle. Example shown below:

As one can see, especially if familiar with calculus, as we increase the number of rectangles we can get higher precision, but for sake of not needing perfection, I think 5 is sufficient. We then also need to worry about creating a rectangle around our character. To keep it simply, and how our character is almost a square, we will just make him a rectangle. Thus, we will need to add this function in our Character.Java class so that we can retrieve the character’s rectangle on demand:
1
2
3
4
5
6
7
|
    //returns a rectangle shape of the object
    public Rectangle getRectangle(){
        Rectangle rectangle;
        //creates a rectangle using the characters location and dimensions
        rectangle = new Rectangle(x,y,texture.getWidth(),texture.getHeight());
        return rectangle;
    }
|
So then to test if the rectangles of our icicle overlap that of our character, we will make our collision checker function, placed in our GameScreen.Java class is as follows:
 1
 2
 3
 4
 5
 6
 7
 8
 9
10
11
12
13
14
15
16
17
18
19
20
21
22
23
|
    public void checkCollision(){
        //creates an iterator which will analyze each icicile
        Iterator<Icicle> iterIcicle = icicleArray.iterator();

        //while there are more icicles to process...
        while(iterIcicle.hasNext()) {
            //move to next icicle and set a reference to our icicle
            Icicle icicle = iterIcicle.next();
            //creates 5 rectangles for the icicle
            for(int i = 0; i < 5; i++){
                float yPos = icicle.y+icicle.texture.getHeight()-((float)i/5)*icicle.texture.getHeight();
                float yThickness = (float)(1/5)*icicle.texture.getHeight();
                float xPos = icicle.x+icicle.texture.getWidth()/2-(((float)(5-i)/(float)5)*icicle.texture.getWidth())/2;
                float xThickness = (((float)(5-i)/(float)5)*icicle.texture.getWidth());
                //creates a new rectangle with our dimensions
                Rectangle rectangle = new Rectangle(xPos,yPos,xThickness,yThickness);
                //if our created rectangle overlaps our character
                if(rectangle.overlaps(character.getRectangle())){
                    gameOver = true;
                }
            }
        }
    }
|
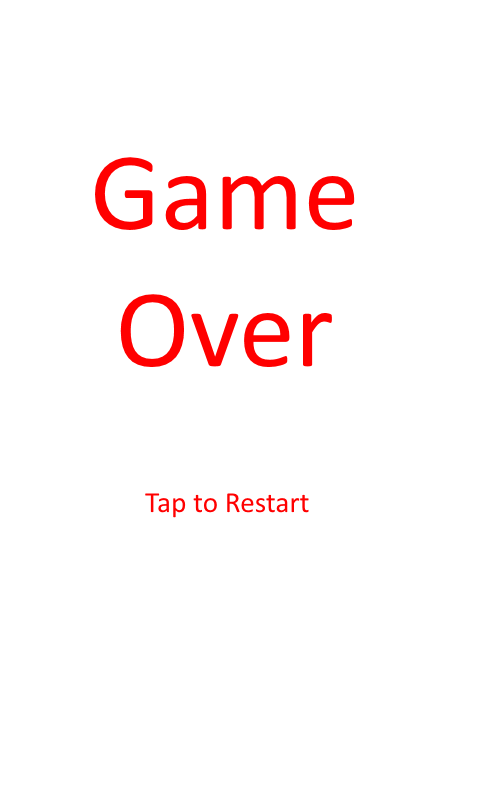
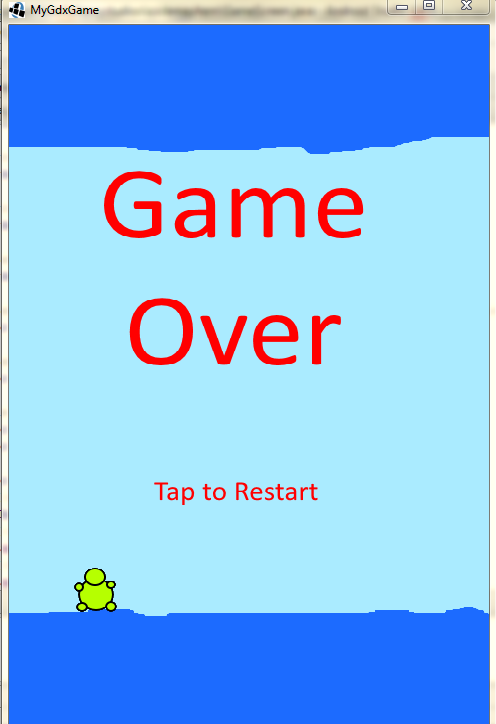
Now to facilitate the game ending, we wish for a Game Over screen to appear and the player will simply need to tap to restart it. Thus I simply just created a gameOver.png file that is 480*800 to overlay on top of the screen:
Now, upon the game becoming over we wish to display this screen, remove the icicles, and stop the player. Then we would like for the player to only need to press down on the screen to restart it, however, the moment the player dies, the finger will still be on the screen (due to reaction times and what not) and that will cause our game to restart. Thus, I will be adding another variable called “fingerUp” that will become true once the player lifts his finger off of the screen, then allowing the game to restart upon being pressed. All of the codes are shown below:
Two new variables in GameScreen Class:
1
2
3
|
//game over booleans
    public boolean gameOver = false;
    public boolean fingerUp = false;
|
Changing the Render Section in GameScreen Class:
 1
 2
 3
 4
 5
 6
 7
 8
 9
10
11
12
13
14
15
16
17
18
19
20
21
22
23
24
25
26
27
28
29
30
31
32
33
34
35
36
37
|
@Override
    public void render(float deltaTime){
        //Sets the color to be applied after clearing the screen (R,G,B,A)
        Gdx.gl.glClearColor(0,0,255,1);
        //Clears the screen
        Gdx.gl.glClear(GL20.GL_COLOR_BUFFER_BIT);
        //updates camera view
        camera.update();
        //makes the camera fit onto the available screen
        game.gameBatch.setProjectionMatrix(camera.combined);
        //checks if the screen is pressed
        checkScreenPress();
        //if game is not over
        if(!gameOver) {
            //updates the character
            character.update(deltaTime);
            //updates Icicle Manager
            icicleManager.update(icicleArray,deltaTime);
        }
        //Starts gameBatch for drawing
        game.gameBatch.begin();
        //All drawing needs to be done here
        //Draws the Cave Background starting at x = 0, y = 0
        game.gameBatch.draw(caveBackground,0,0);
        if(!gameOver) {
            //Draws the Icicles
            drawIcicles(deltaTime);
            //checks for collisions of icicles
            checkCollision();
        }else{
            game.gameBatch.draw(gameOverTexture,0,0);
        }
        //Draws the character at correct location
        game.gameBatch.draw(character.texture,character.x,character.y);
        //Ends the gameBatch after drawing
        game.gameBatch.end();
    }
|
Changing the touchUp function in GameScreen:
 1
 2
 3
 4
 5
 6
 7
 8
 9
10
|
    //called when the person lifts their finger off of the screen
    public boolean touchUp (int x, int y, int pointer, int button) {
        //set character to standing
        character.setStanding();
        //if game over and lifts finger, fingerUp = true
        if(gameOver){
            fingerUp = true;
        }
        return false;
    }
|
And finally changing the checkScreenPress function in GameScreen:
 1
 2
 3
 4
 5
 6
 7
 8
 9
10
11
12
13
14
15
16
17
18
19
20
21
22
23
24
|
//checks if the screen is pressed
    public void checkScreenPress(){
        //if screen is pressed
        if(Gdx.input.isTouched()) {
            //gets the location of the press, and determines which half of the screen was pressed
            if ((float) Gdx.input.getX() / Gdx.graphics.getWidth() <= .5) {
                //if left half of screen, go left
                character.goLeft();
            } else {
                //if not on the left half of screen, it must be going right
                character.goRight();
            }
            //if screen is taped after game is over and finger is lifted off screen
            if(gameOver && fingerUp){
                //resets char x position
                character.x = 240;
                //clears icicles by creating new array
                icicleArray = new Array<Icicle>();
                //resets vars
                gameOver = false;
                fingerUp = false;
            }
        }
    }
|
Now your game has an ending and restarting capabilities.
Step 8:
The last necessary step in our game, keeping score and high score. We are going to do a simply method of simply +1 point for every icicle dodged, and we will keep track of the high score by writing it to an external file. First we will need to define three new variables in our game screen class:
1
2
3
4
5
6
|
    //creates a reference to a local file
    FileHandle file = Gdx.files.local("myfile.txt");
    //stores our highscore
    public int highScore;
    //our score
    public int score = 0;
|
Then in our initialization code in GameScreen, we want to create a function that loads our high score before the game starts. So add a function call in the initialization code and create the following function:
 1
 2
 3
 4
 5
 6
 7
 8
 9
10
11
12
13
14
15
16
17
18
19
20
21
22
23
24
25
26
|
    public GameScreen(MyGdxGame game) {
        //assigns the game we passed to the placeholder
        this.game = game;
        //creates the camera
        camera = new OrthographicCamera();
        //Sets the screen to be 800 width by 480 height
        camera.setToOrtho(false, 480, 800);
        //very important, lets us use the Input methods!
        Gdx.input.setInputProcessor(this);
        //loads highscores
        loadHighScores();
    }

    //function that loads the high scores
    public void loadHighScores(){
        //if the files exists go into loop, if it does not exist, it creates a new one.
        if(file.exists()) {
            try {
                //reads the first line of the file and reads it as an integer
                highScore = Integer.parseInt(file.readString());
            } catch (NumberFormatException e){
                //if there was no high score found, set it to 0
                highScore = 0;
            }
        }
    }
|
Next, we want to be able to add to the score upon removing an icicle, change this section in drawIcicles to account for adding score:
1
2
3
4
5
6
7
|
            if(icicle.y < 0){
               iterIcicle.remove();
               score++;
            }else{
                //else, draw the icicle on the screen.
                game.gameBatch.draw(icicle.texture,icicle.x,icicle.y);
            }
|
Now we need to add a code for writing out the new high score, we will place this in the checkScreenPress section as we have a code that is executed upon game over:
 1
 2
 3
 4
 5
 6
 7
 8
 9
10
11
12
13
14
15
16
17
18
19
20
21
22
23
24
25
26
27
28
29
30
31
32
33
|
//checks if the screen is pressed
    public void checkScreenPress(){
        //if screen is pressed
        if(Gdx.input.isTouched()) {
            //gets the location of the press, and determines which half of the screen was pressed
            if ((float) Gdx.input.getX() / Gdx.graphics.getWidth() <= .5) {
                //if left half of screen, go left
                character.goLeft();
            } else {
                //if not on the left half of screen, it must be going right
                character.goRight();
            }
            //if screen is taped after game is over and finger is lifted off screen
            if(gameOver && fingerUp){
                //resets char x position
                character.x = 240;
                //clears icicles by creating new array
                icicleArray = new Array<Icicle>();
                //resets vars
                gameOver = false;
                fingerUp = false;
                //if score was higher than the high score
                if(score > highScore){
                    //write value of score to our file
                    file.writeString(String.valueOf(score),false);
                    //set our in-game high score to our new score
                    highScore = score;
                }
                //resets score
                score = 0;
            }
        }
    }
|
Finally, we want the player to be able to see the score while he is playing, for this, we will simply just draw then onto the top of the screen using libgdx’s default text printer as such in the render section:
1
2
|
//draws the score and high score
        game.gameFont.draw(game.gameBatch,"Score: " + score + "       High Score: " + highScore,0,800);
|
Then upon running, you hopefully will be able to keep score!
And you are complete! That is it! You have a complete game with an objective, an enemy, a restarting ability, and a score keeping function. You have created you first game! However there are two additional steps that are completely optional to continue on that I will include, but for completeness, I will now post the entire java files here:
Character.Java:
 1
 2
 3
 4
 5
 6
 7
 8
 9
10
11
12
13
14
15
16
17
18
19
20
21
22
23
24
25
26
27
28
29
30
31
32
33
34
35
36
37
38
39
40
41
42
43
44
45
46
47
48
49
50
51
52
53
54
55
56
57
58
59
60
|
public class Character {
    //stores x loc (start at 240)
    int x = 240;
    //stores y loc (start at 167)
    int y = 167;
    //texture for our character
    public Texture texture = new Texture("guy.png");
    //speed for our character in pixels/s
    int speed = 300;

    //defining constants for direction
    static final int LEFT = -1;
    static final int RIGHT = 1;
    static final int STANDING = 0;
    int direction = 0;

    //initialization code
    public Character(){}

    //updates character's position
    public void update(float deltaTime){
        //stores the value of the last x
        int lastx = this.x;
        //change in distance = direction * speed * time
        this.x += direction*speed*deltaTime;
        //if the new location of the character is off the screen to the left
        if(this.x < 0){
            //put the character back to last location
            this.x = lastx;
        }
        //if the new location of the character is off the screen to the right
        if(this.x > 480 - texture.getWidth()){
            //put the character back to last location
            this.x = lastx;
        }
    }

    //changes the character direction to right
    public void goRight(){
        direction = RIGHT;
    }

    //changes character direction to left
    public void goLeft(){
        direction = LEFT;
    }

    //changes character direction to standing
    public void setStanding(){
        direction = STANDING;
    }

    //returns a rectangle shape of the object
    public Rectangle getRectangle(){
        Rectangle rectangle;
        //creates a rectangle using the characters location and dimensions
        rectangle = new Rectangle(x,y,texture.getWidth(),texture.getHeight());
        return rectangle;
    }
}
|
GameScreen.Java:
  1
  2
  3
  4
  5
  6
  7
  8
  9
 10
 11
 12
 13
 14
 15
 16
 17
 18
 19
 20
 21
 22
 23
 24
 25
 26
 27
 28
 29
 30
 31
 32
 33
 34
 35
 36
 37
 38
 39
 40
 41
 42
 43
 44
 45
 46
 47
 48
 49
 50
 51
 52
 53
 54
 55
 56
 57
 58
 59
 60
 61
 62
 63
 64
 65
 66
 67
 68
 69
 70
 71
 72
 73
 74
 75
 76
 77
 78
 79
 80
 81
 82
 83
 84
 85
 86
 87
 88
 89
 90
 91
 92
 93
 94
 95
 96
 97
 98
 99
100
101
102
103
104
105
106
107
108
109
110
111
112
113
114
115
116
117
118
119
120
121
122
123
124
125
126
127
128
129
130
131
132
133
134
135
136
137
138
139
140
141
142
143
144
145
146
147
148
149
150
151
152
153
154
155
156
157
158
159
160
161
162
163
164
165
166
167
168
169
170
171
172
173
174
175
176
177
178
179
180
181
182
183
184
185
186
187
188
189
190
191
192
193
194
195
196
197
198
199
200
201
202
203
204
205
206
207
208
209
210
211
212
213
214
215
216
217
218
219
220
221
222
223
224
225
226
227
228
229
230
231
232
233
234
235
236
237
238
239
240
241
242
243
244
245
246
247
248
249
250
251
252
253
254
255
256
257
258
259
260
261
262
263
264
265
266
267
268
269
|
public class GameScreen implements Screen,InputProcessor {

    //Creates a reference to hold our "passed" game.
    private MyGdxGame game;

    //Defining the camera to be used
    private OrthographicCamera camera;

    //Texture for the cave background
    private Texture caveBackground = new Texture("cavebackground.png");

    //Texture for the game over
    private Texture gameOverTexture = new Texture("gameOver.png");

    //Creates a Reference for our character
    private Character character = new Character();

    //Creates our icicle Manager with a description of how long to delay each icicle type
    public IcicleManager icicleManager = new IcicleManager(2,5,10);

    //creates an array to hold all of our icicles;
    public Array<Icicle> icicleArray = new Array<Icicle>();

    //game over booleans
    public boolean gameOver = false;
    public boolean fingerUp = false;

    //creates a reference to a local file
    FileHandle file = Gdx.files.local("myfile.txt");
    //stores our highscore
    public int highScore;
    //our score
    public int score = 0;

    public GameScreen(MyGdxGame game) {
        //assigns the game we passed to the placeholder
        this.game = game;
        //creates the camera
        camera = new OrthographicCamera();
        //Sets the screen to be 800 width by 480 height
        camera.setToOrtho(false, 480, 800);
        //very important, lets us use the Input methods!
        Gdx.input.setInputProcessor(this);
        //loads highscores
        loadHighScores();
    }
    @Override
    public void render(float deltaTime){
        //Sets the color to be applied after clearing the screen (R,G,B,A)
        Gdx.gl.glClearColor(0,0,255,1);
        //Clears the screen
        Gdx.gl.glClear(GL20.GL_COLOR_BUFFER_BIT);
        //updates camera view
        camera.update();
        //makes the camera fit onto the available screen
        game.gameBatch.setProjectionMatrix(camera.combined);
        //checks if the screen is pressed
        checkScreenPress();
        //if game is not over
        if(!gameOver) {
            //updates the character
            character.update(deltaTime);
            //updates Icicle Manager
            icicleManager.update(icicleArray,deltaTime);
        }
        //Starts gameBatch for drawing
        game.gameBatch.begin();
        //All drawing needs to be done here
        //Draws the Cave Background starting at x = 0, y = 0
        game.gameBatch.draw(caveBackground,0,0);
        if(!gameOver) {
            //Draws the Icicles
            drawIcicles(deltaTime);
            //checks for collisions of icicles
            checkCollision();
        }else{
            game.gameBatch.draw(gameOverTexture,0,0);
        }
        //Draws the character at correct location
        game.gameBatch.draw(character.texture,character.x,character.y);
        //draws the score and high score
        game.gameFont.draw(game.gameBatch,"Score: " + score + "       High Score: " + highScore,0,800);
        //Ends the gameBatch after drawing
        game.gameBatch.end();
    }

    //draws our icicles
    public void drawIcicles(float deltaTime){
        //creates an iterator which will analyze each icicile
        Iterator<Icicle> iterIcicle = icicleArray.iterator();

        //while there are more icicles to process...
        while(iterIcicle.hasNext()) {
            //move to next icicle and set a reference to our icicle
            Icicle icicle = iterIcicle.next();
            //update our icicle
            icicle.update(deltaTime);
            //if icicle is below y = 0, remove icicle from the array
            if(icicle.y < 0){
               iterIcicle.remove();
               score++;
            }else{
                //else, draw the icicle on the screen.
                game.gameBatch.draw(icicle.texture,icicle.x,icicle.y);
            }

        }
    }

    public void checkCollision(){
        //creates an iterator which will analyze each icicile
        Iterator<Icicle> iterIcicle = icicleArray.iterator();

        //while there are more icicles to process...
        while(iterIcicle.hasNext()) {
            //move to next icicle and set a reference to our icicle
            Icicle icicle = iterIcicle.next();
            //creates 5 rectangles for the icicle
            for(int i = 0; i < 5; i++){
                float yPos = icicle.y+icicle.texture.getHeight()-((float)i/5)*icicle.texture.getHeight();
                float yThickness = (float)(1/5)*icicle.texture.getHeight();
                float xPos = icicle.x+icicle.texture.getWidth()/2-(((float)(5-i)/(float)5)*icicle.texture.getWidth())/2;
                float xThickness = (((float)(5-i)/(float)5)*icicle.texture.getWidth());
                //creates a new rectangle with our dimensions
                Rectangle rectangle = new Rectangle(xPos,yPos,xThickness,yThickness);
                //if our created rectangle overlaps our character
                if(rectangle.overlaps(character.getRectangle())){
                    gameOver = true;
                }
            }
        }
    }


    //This method gets called when a key is pressed down
    public boolean keyDown (int keycode) {
        //switches case for keycode variable
        switch (keycode) {
            //if left key is pressed
            case Input.Keys.LEFT:
                //sets character going left
                character.goLeft();
                break;
            case Input.Keys.RIGHT:
                //sets character going right
                character.goRight();
                break;
            default:
        }
        return false;
    }

    //happens upon lifting finger off of key
    public boolean keyUp (int keycode) {
        //sets character standing upon lifting off of key
        character.setStanding();
        return false;
    }

    //checks if the screen is pressed
    public void checkScreenPress(){
        //if screen is pressed
        if(Gdx.input.isTouched()) {
            //gets the location of the press, and determines which half of the screen was pressed
            if ((float) Gdx.input.getX() / Gdx.graphics.getWidth() <= .5) {
                //if left half of screen, go left
                character.goLeft();
            } else {
                //if not on the left half of screen, it must be going right
                character.goRight();
            }
            //if screen is taped after game is over and finger is lifted off screen
            if(gameOver && fingerUp){
                //resets char x position
                character.x = 240;
                //clears icicles by creating new array
                icicleArray = new Array<Icicle>();
                //resets vars
                gameOver = false;
                fingerUp = false;
                //if score was higher than the high score
                if(score > highScore){
                    //write value of score to our file
                    file.writeString(String.valueOf(score),false);
                    //set our in-game high score to our new score
                    highScore = score;
                }
                //resets score
                score = 0;
            }
        }
    }

    //called when the person lifts their finger off of the screen
    public boolean touchUp (int x, int y, int pointer, int button) {
        //set character to standing
        character.setStanding();
        //if game over and lifts finger, fingerUp = true
        if(gameOver){
            fingerUp = true;
        }
        return false;
    }

    //function that loads the high scores
    public void loadHighScores(){
        //if the files exists go into loop, if it does not exist, it creates a new one.
        if(file.exists()) {
            try {
                //reads the first line of the file and reads it as an integer
                highScore = Integer.parseInt(file.readString());
            } catch (NumberFormatException e){
                //if there was no high score found, set it to 0
                highScore = 0;
            }
        }
    }

    public boolean touchDown(int screenX, int screenY, int pointer, int button) {
        return false;
    }

    public boolean keyTyped (char character) {
        return false;
    }

    public boolean touchDragged (int x, int y, int pointer) {
        return false;
    }

    public boolean mouseMoved (int x, int y) {
        return false;
    }

    public boolean scrolled (int amount) {
        return false;
    }

    @Override
    public void resize(int width, int height){

    }

    @Override
    public void show(){

    }

    @Override
    public void hide(){

    }

    @Override
    public void pause(){

    }

    @Override
    public void resume(){

    }

    @Override
    public void dispose(){

    }

}
|
Icicle.Java:
 1
 2
 3
 4
 5
 6
 7
 8
 9
10
11
12
13
14
15
16
17
18
19
20
21
22
23
24
25
26
27
28
29
30
31
32
33
34
35
36
37
38
39
40
41
42
43
44
45
46
47
|
public class Icicle {
    //variables for x location, y location, and speed of dropping
    public int x;
    public int y;
    public int speed;

    //codes for the three different icicle types
    static final int typeA = 0;
    static final int typeB = 1;
    static final int typeC = 2;
    public int code;

    //placeholder for icicle texture
    public Texture texture;

    //initiation code
    public Icicle(int x, int y, int speed, int code){
        //setting variables
        this.x = x;
        this.y = y;
        this.speed = speed;
        this.code = code;

        //sets texture to icicle depending on code
        switch(code){
            case typeA:
                this.texture = new Texture("icicleA.png");
                break;
            case typeB:
                this.texture = new Texture("icicleB.png");
                break;
            case typeC:
                this.texture = new Texture("icicleC.png");
                break;
        }

        //changes the y value so that irregardless of texture height, it will always start on the
        //the top of the ice cave ceiling.
        this.y -= this.texture.getHeight();
    }

    //updates icicle's y position as it falls with time;
    public void update(float deltaTime){
        this.y -= speed*deltaTime;
    }

}
|
IcicleManager.Java:
 1
 2
 3
 4
 5
 6
 7
 8
 9
10
11
12
13
14
15
16
17
18
19
20
21
22
23
24
25
26
27
28
29
30
31
32
33
34
35
36
37
38
39
40
41
42
43
44
45
46
47
48
49
|
public class IcicleManager {
    //stores the refresh rates set for the icicles
    public int aRefreshRate;
    public int bRefreshRate;
    public int cRefreshRate;

    //keeps a timer for each icicle type
    public float aTimer = 0;
    public float bTimer = 0;
    public float cTimer = 0;

    //initializes icicle manager with our set refresh rates.
    public IcicleManager(int aRefreshRate, int bRefreshRate, int cRefreshRate){
        this.aRefreshRate = aRefreshRate;
        this.bRefreshRate = bRefreshRate;
        this.cRefreshRate = cRefreshRate;
    }

    //receives the array of icicles and updates and returns the array
    public Array<Icicle> update(Array<Icicle> array, float deltaTime){
        //add the time passed to our timers
        aTimer += deltaTime;
        bTimer += deltaTime;
        cTimer += deltaTime;

        //if timer value is greater than refresh rate
        if(aTimer >= aRefreshRate){
            //create a new icicle at a random x Loc, 670 height, 300 speed, and a typeA icicle
            array.add(new Icicle(MathUtils.random(0,460),670,300,Icicle.typeA));
            //reset Timer
            aTimer = 0;
        }
        //if timer value is greater than refresh rate
        if(bTimer >= bRefreshRate){
            //create a new icicle at a random x Loc, 670 height, 300 speed, and a typeB icicle
            array.add(new Icicle(MathUtils.random(0,460),670,300,Icicle.typeB));
            //reset Timer
            bTimer = 0;
        }
        //if timer value is greater than refresh rate
        if(cTimer >= cRefreshRate){
            //create a new icicle at a random x Loc, 670 height, 300 speed, and a typeB icicle
            array.add(new Icicle(MathUtils.random(0,460),670,300,Icicle.typeC));
            //reset Timer
            cTimer = 0;
        }
        return array;
    }
}
|
MyGdxGame.Java:
 1
 2
 3
 4
 5
 6
 7
 8
 9
10
11
12
13
14
15
16
17
18
19
20
21
22
23
24
25
26
27
28
29
30
31
32
33
34
35
|
public class MyGdxGame extends Game {

    //Define a public Spritebatch which we will use to render text onto the screen
    public SpriteBatch gameBatch;

    //Define a public font that we will use for all text.
    public BitmapFont gameFont;

    //Public void create() is ran when the program is started.
 @Override
 public void create () {
        //Creates the SpriteBatch for gameBatch to use
        gameBatch = new SpriteBatch();

        //Creates the font, which is the default font for LIBgdx.
        gameFont = new BitmapFont();

        //this will set the screen to our next class "GameScreen"
        this.setScreen(new GameScreen(this));
 }

    //Called upon render
 @Override
 public void render () {
        //Calls our render() method in our GameScreen
        super.render();
 }

    //Called when class is disposed
    public void dispose() {
        //disposes both SpriteBatch and BitmapFont
        gameBatch.dispose();
        gameFont.dispose();
    }
}
|
(Optional) Step 9:
Creating better graphics! I will create better graphics for this game as to show how much of a difference it can make, but I want you to let your imiganation take hold of this one! You could even change everything such as the icicles are missiles instead and you are a tank trying to dodge them, the ideas are endless! Just a heads up, I am not by any means an artist, I only spent about 25 minutes on changing the graphics, and here is the end result first, so you may see if it is worth your time to copy the images.
If you do enjoy the newer images, here they all are, simply just overwrite the existing ones:
cavebackground.png
guy.png:
icicleA.png:
icicleB.png:
icicleC.png:
And with that simply upgrade, the game, atleast to me, looks a lot better! I am sure many of you have a fantastic imagination and most likely better artist skills than I, so let your ideas fly.
(Optional) Step 10:
In this step, I am going to show you how to add AdMob into an libgdx game for android if that is something you wish. We will be adding a simple banner add to the bottom of the screen that will display at all times. First you will need to add the google ads library into your project. To do this, go to project structure -> android -> dependencies -> green plus on left side -> add library depedency -> com.google.android.gms:play-services:6.5.87 -> apply -> ok. It will then do a gradle sync.
Then in your manifest, you will need to add permisions, a meta-data, and an applicaiton, my manifest is shown below:
 1
 2
 3
 4
 5
 6
 7
 8
 9
10
11
12
13
14
15
16
17
18
19
20
21
22
23
24
25
26
27
28
29
30
31
32
|
<?xml version="1.0" encoding="utf-8"?>
<manifest xmlns:android="http://schemas.android.com/apk/res/android"
    package="com.chewystudios.iciclemayhem.android"
    android:versionCode="1"
    android:versionName="1.0" >
    <uses-permission android:name="android.permission.INTERNET"/>
    <uses-permission android:name="android.permission.ACCESS_NETWORK_STATE"/>
    <uses-sdk android:minSdkVersion="9" android:targetSdkVersion="21" />

    <application
        android:allowBackup="true"
        android:icon="@drawable/ic_launcher"
        android:label="@string/app_name"
        android:theme="@style/GdxTheme" >
        <meta-data android:name="com.google.android.gms.version"
            android:value="@integer/google_play_services_version" />
        <activity
            android:name="com.chewystudios.iciclemayhem.android.AndroidLauncher"
            android:label="@string/app_name"
            android:screenOrientation="portrait"
            android:configChanges="keyboard|keyboardHidden|orientation|screenSize">
            <intent-filter>
                <action android:name="android.intent.action.MAIN" />
                <category android:name="android.intent.category.LAUNCHER" />
            </intent-filter>
        </activity>
        <activity android:name="com.google.android.gms.ads.AdActivity"
            android:configChanges="keyboard|keyboardHidden|orientation|screenLayout|uiMode|screenSize|smallestScreenSize"
            android:theme="@android:style/Theme.Translucent" />
    </application>

</manifest>
|
Then you are going to need to edit AndroidLauncher.java under the android directory. I will not explain what each step does to just save some time, but if you simply change your AndroidLauncher.java to the following, and you have made it so far, it will most likely make some sense to you. One hint, we are simply creating two views on the screen, one for the ad, and on for the game, and placcing them together onto the screen:
 1
 2
 3
 4
 5
 6
 7
 8
 9
10
11
12
13
14
15
16
17
18
19
20
21
22
23
24
25
26
27
28
29
30
31
32
33
|
        @Override
 protected void onCreate (Bundle savedInstanceState) {
  super.onCreate(savedInstanceState);
  AndroidApplicationConfiguration config = new AndroidApplicationConfiguration();
  //initialize(new MyGdxGame(), config);

        //ADMOB STUFF///
        requestWindowFeature(Window.FEATURE_NO_TITLE);
        getWindow().setFlags(WindowManager.LayoutParams.FLAG_FULLSCREEN,
                WindowManager.LayoutParams.FLAG_FULLSCREEN);
        getWindow().clearFlags(WindowManager.LayoutParams.FLAG_FORCE_NOT_FULLSCREEN);

        AdView adView = new AdView(this);
        adView.setAdSize(AdSize.BANNER);
        adView.setAdUnitId("Add Your Ad UNIT ID Here");
        AdRequest.Builder adRequestBuilder = new AdRequest.Builder();
        adRequestBuilder.addTestDevice(AdRequest.DEVICE_ID_EMULATOR);
        adView.loadAd(adRequestBuilder.build());

        RelativeLayout layout = new RelativeLayout(this);
        View gameView = initializeForView(new MyGdxGame(), config);

        RelativeLayout.LayoutParams adParams =
                new RelativeLayout.LayoutParams(RelativeLayout.LayoutParams.WRAP_CONTENT,
                        RelativeLayout.LayoutParams.WRAP_CONTENT);
        adParams.addRule(RelativeLayout.ALIGN_PARENT_BOTTOM);


        layout.addView(gameView);
        layout.addView(adView, adParams);
        setContentView(layout);
        //END ADMOB STUFF//
 }
|
If you have futher issues with the admob addition, please let me know by leaving a comment, i’ll be happy to help.
Final Step:
Your game is complete, you can upload it to the marketplace! We did leave out one step of changing the launch icon for your app, but it is rather simple to look up how to do, the launch icon is located in the androidmanifest.xml file. Now it is time to publish and immediatly start having a flush of new ideas you wish to have for the game. As I was placing the final touches, some ideas have came into my head such as adding walking animation and making the icicles fall more realisticly, heck, I might even create a part 2 to this, just so we can start doing complicated things. Anyways, let me know if you have any questions! Happy to help.